 AnimeGameVerse
Conquering Golden Hour Dream Ticker Puzzles in Honkai: Star Rail 2026 Edition
Honkai Star Rail Golden Hour Dream Ticker puzzles challenge players with clever 3D platforming and mind-bending mechanics.
Hey, Trailblazer! It’s 2026, and if you’ve somehow managed to avoid the Golden Hour’s Dream Ticker puzzles until now, I envy you. But if you’re here pulling your hair out, relax—I’ve got you covered. These puzzles first dropped back in version 2.0, and despite the years and a dozen galactic updates, they still hold a special place in my heart as some of the most delightfully infuriating clockwork contraptions I’ve ever fiddled with. The Penacony dreamscape might have expanded with even weirder attractions, but the Golden Hour remains that one corner where Clockie still needs rescuing from its own mechanical mayhem. So grab a coffee, take a deep breath, and let’s untangle these 3D platforming nightmares together.
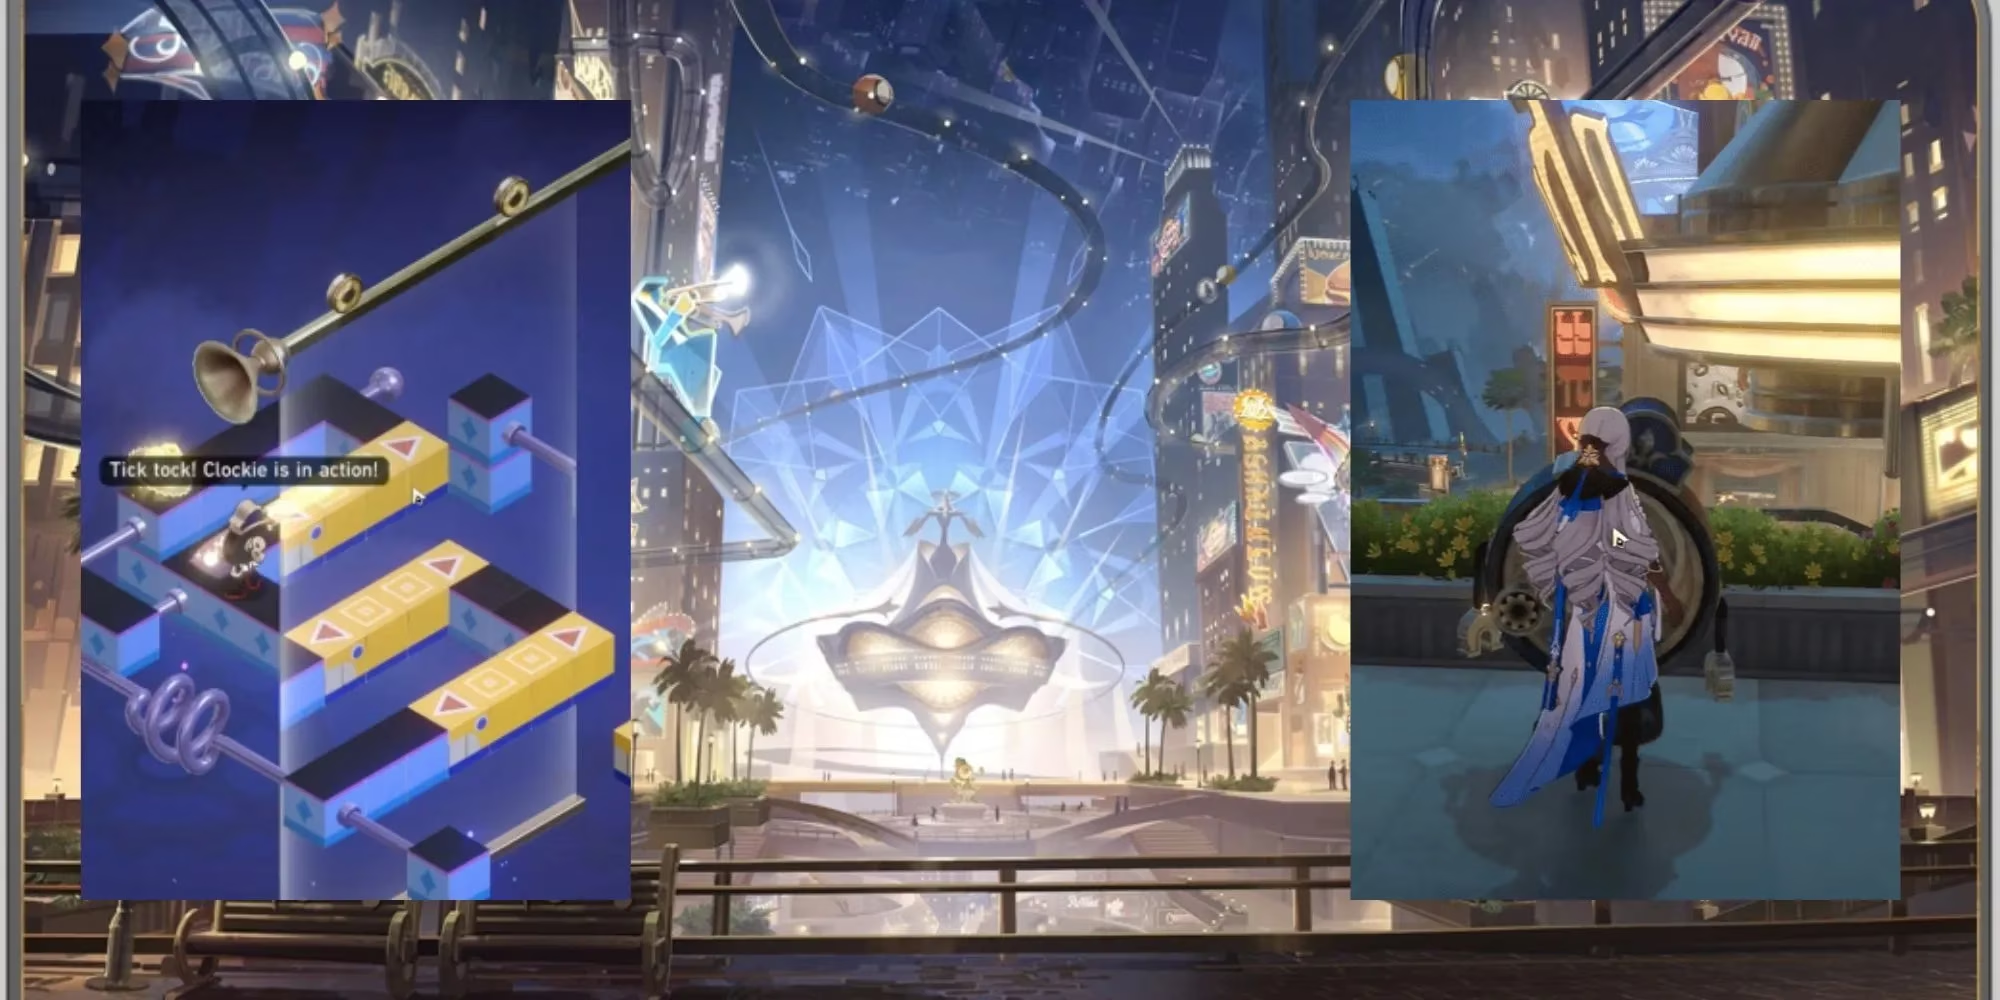
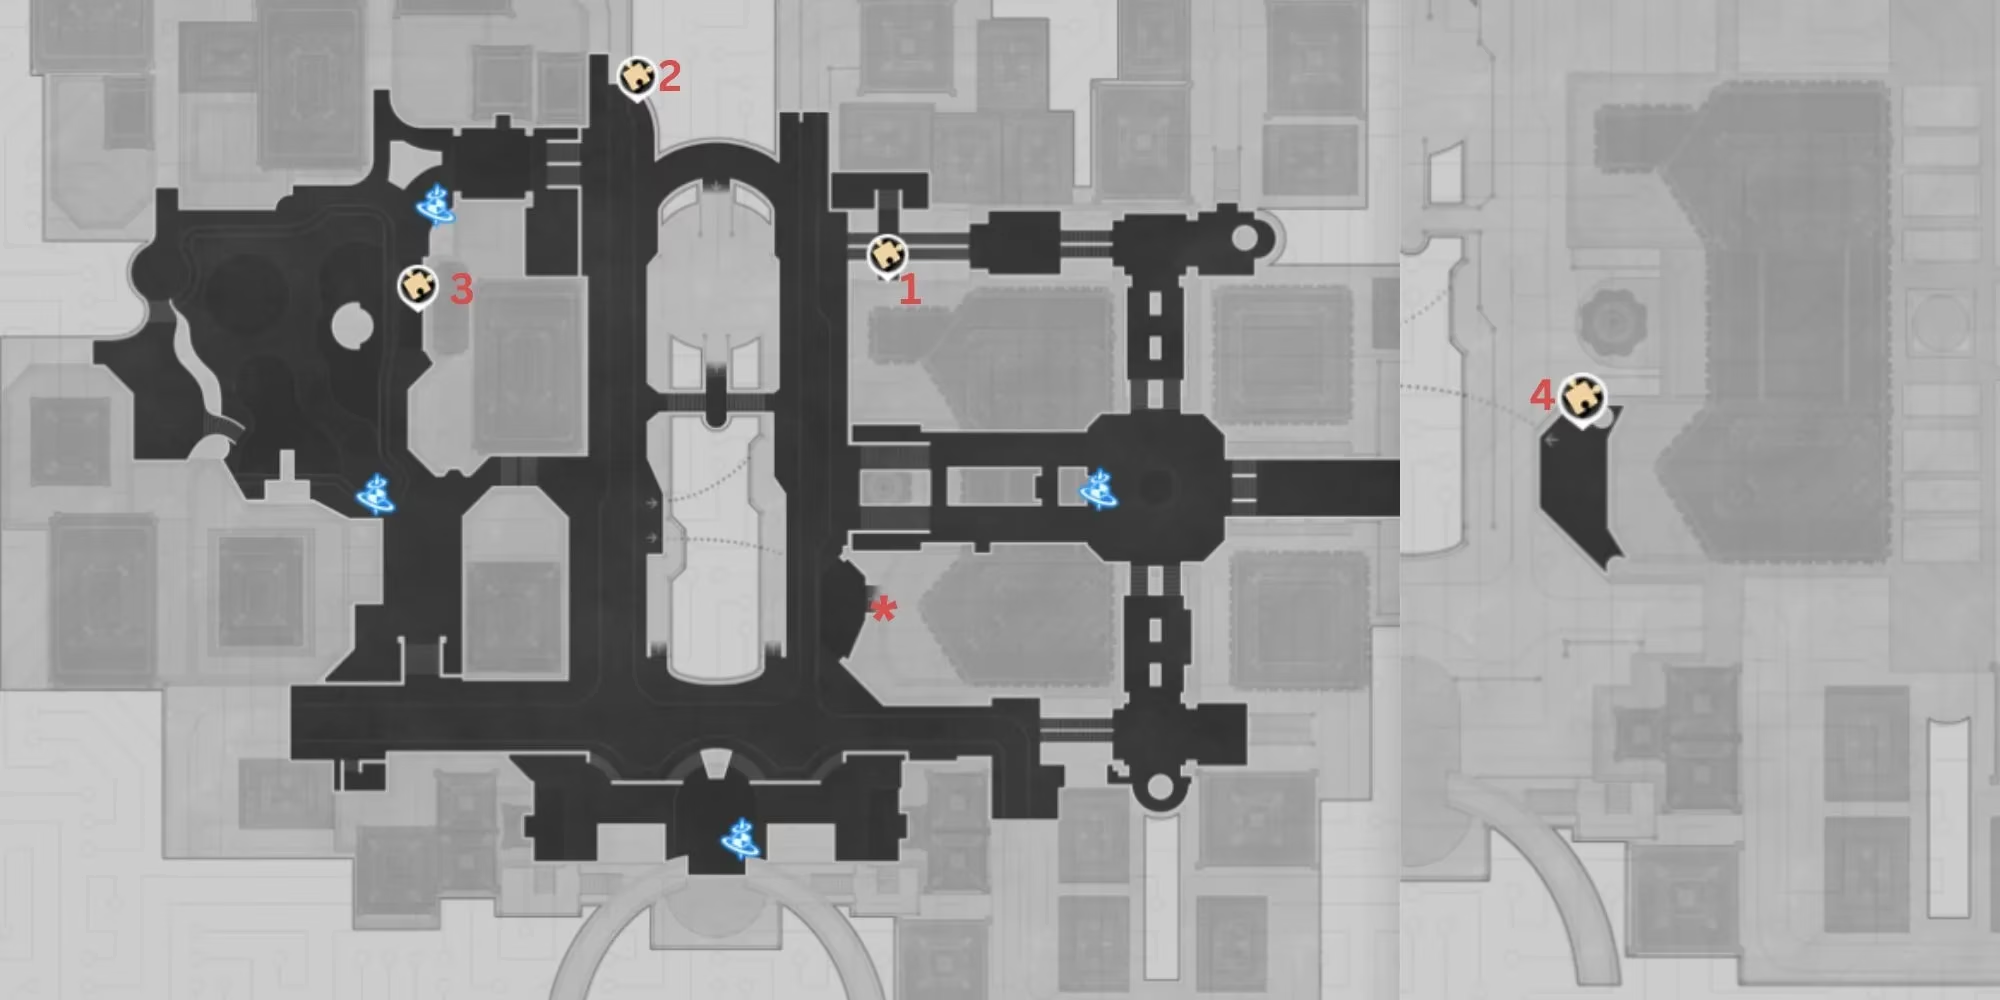
Now, before we start flipping gears and sliding platforms like caffeinated raccoons, let’s get our bearings. The Golden Hour is this glitzy, never-sleeping district where the pavement glows and the slot machines chirp sweet nothings. Scattered across its multiple floors, you’ll find four Dream Ticker puzzles, each more stubborn than the last. Three of them lounge on the second floor like they own the place, while one hoity-toity puzzle sits up on the third floor, reachable only via the Bubble Pinball Machine (because apparently Hoyoverse thinks we all enjoy pinball physics). Here’s a map to save your sanity:
The goal is absurdly simple: get Clockie from its starting platform to that shiny golden gear. The execution? A symphony of sliding blocks, rotating platforms, and mirrors that reflect alternate realities. Yes, mirrors. They don’t just show your tired face—they actually duplicate and flip the movable pieces, making you question whether you’re a Trailblazer or a quantum physicist.
Alright, let’s crack these one by one. I’ll walk you through them like an old friend, with just enough sass to keep things interesting.
Puzzle #1 – The Northeastern Corridor Charmer
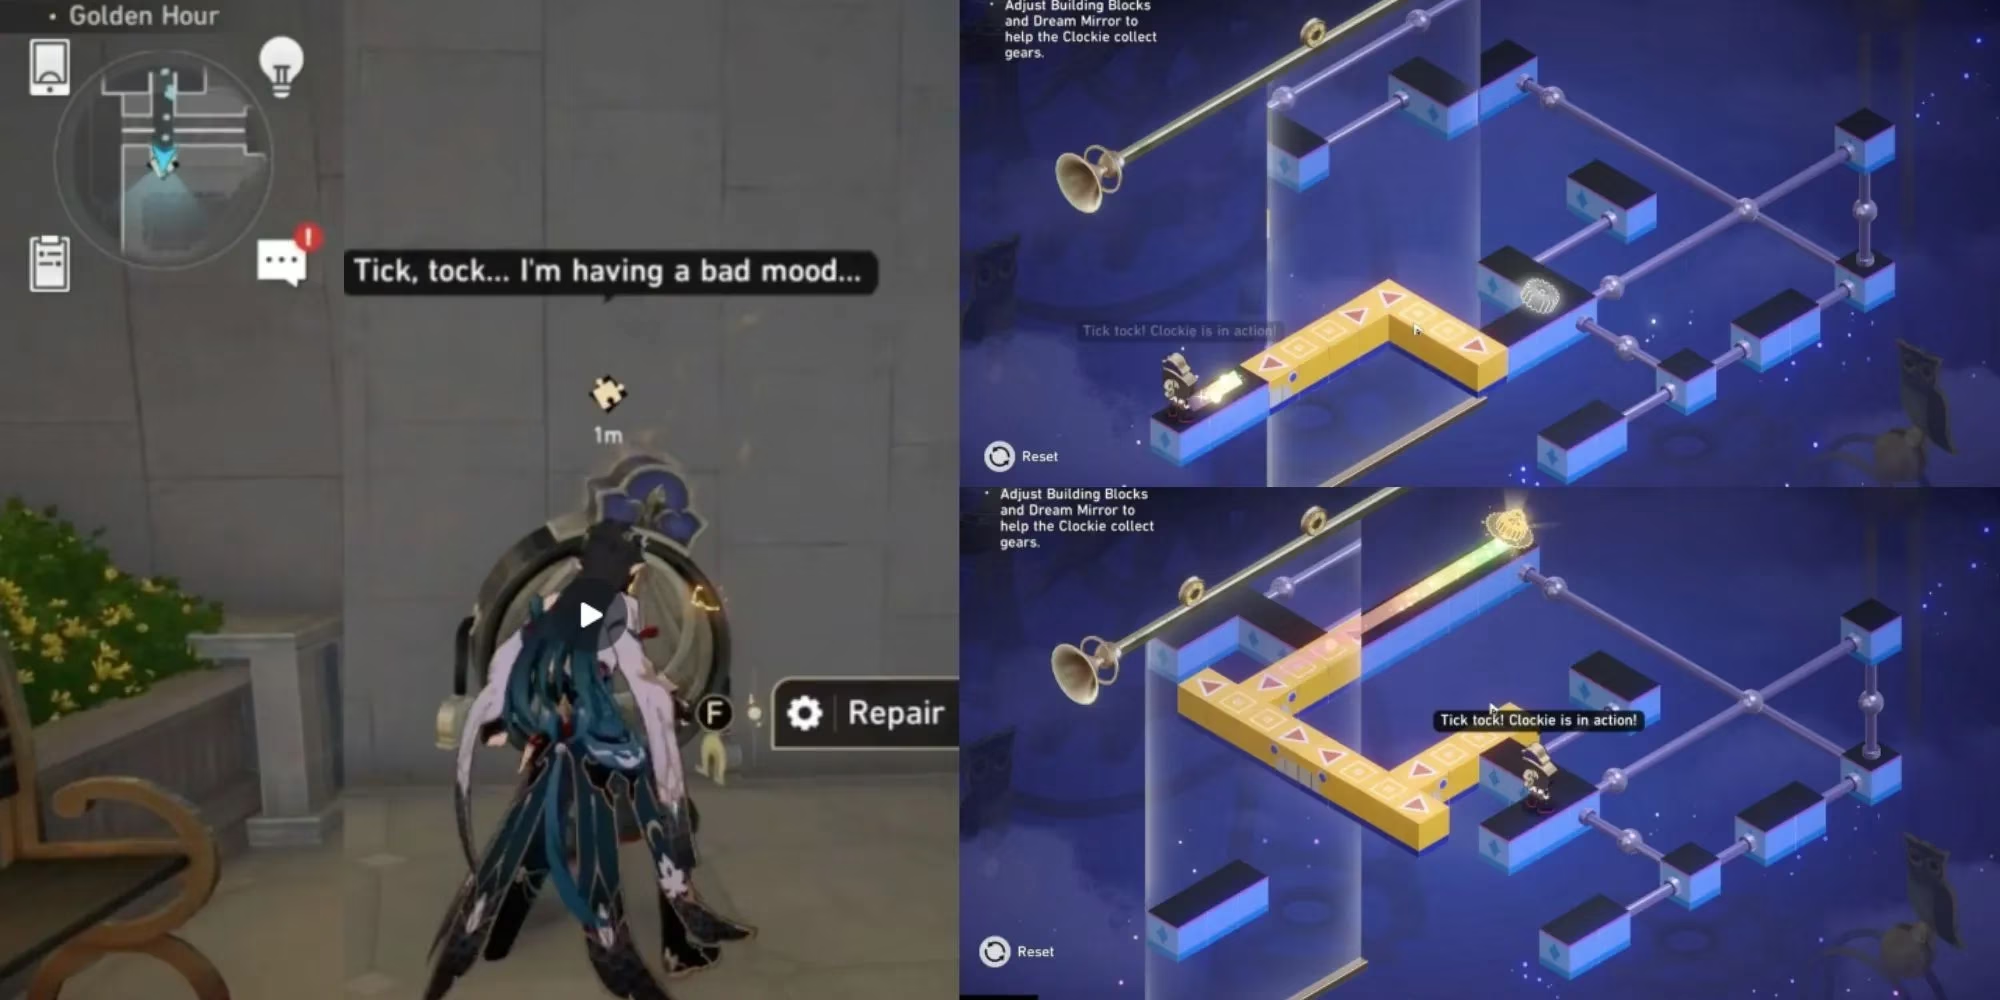
This little rascal is tucked into a corridor on the northeast side of the second floor. It looks innocent, but it’s basically training you for the chaos ahead. The puzzle is split into two phases, and if you mess up, don’t worry—you can reset. No permanent damage, just a bruised ego.
-
Phase 1: There’s a long sideways piece that acts like a diva bridge. Slide it all the way to the end—yes, shove it right up against the edge. Now you’ve cleared space for the other movable platform to glide forward and kiss the spot where Clockie stands. After that, drag the sideways piece back so it connects both the gear’s platform and the other movable block. Clockie can now hop across. Easy peasy, right? Don’t get cocky.
-
Phase 2: That sideways piece needs to be pushed to the extreme again, letting the secondary platform trundle all the way to the far side and bump into a tiny stationary platform. Then, bring the sideways piece back until it touches the mirror. Wait, the mirror? Yep, that reflective panel on the left wall. Make sure you’ve slid the mirror to the leftmost position beforehand—otherwise it’s like winking at a blind date. Once everything’s lined up, the mirror clones the bridge, forming an impossible-looking pathway. Clockie sashays across and snags the gear.
I still remember my first attempt. I moved the mirror after the bridge, and Clockie just stood there, unimpressed. Learn from my shame.
Puzzle #2 – The Northern Roundabout Trickster
Up at the most northern tip of the map, you’ll find Puzzle 2 hanging out in a rounded dead-end. At first glance it looks simple: just one movable platform, an immovable central platform, and that oh-so-important mirror. But this puzzle will test your ability to align reflections with surgical precision.
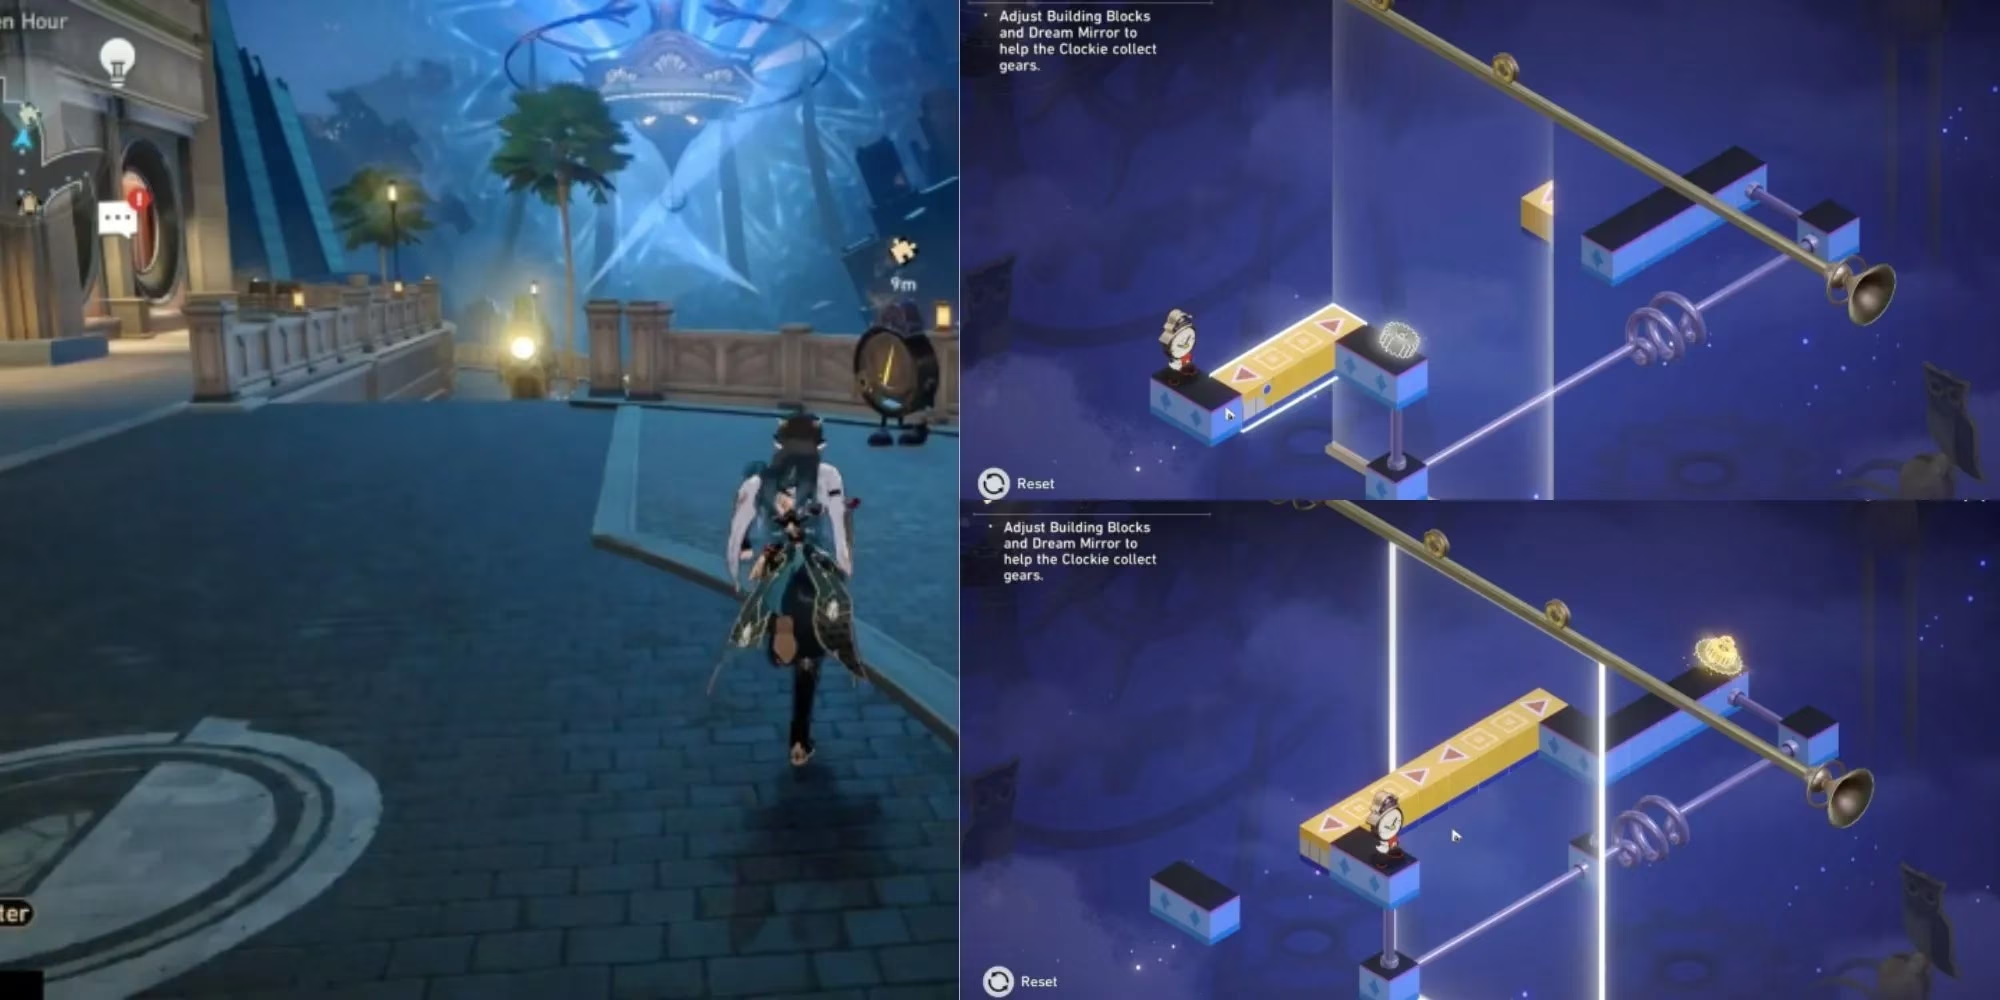
Phase 1 is mercifully already solved for you (the devs must have been feeling generous). For Phase 2, here’s the trick: the mirror needs to sit somewhere in the middle, not slammed to either side. Why? Because you need its reflection to make the immovable platform look like it’s holding hands with the gear platform on the opposite end. It’s all about perception. Move the mirror just a smidge left or right until the optical lie is perfect—when the two disconnected chunks appear seamless. Then send your movable platform over until it caresses that mirror. Voilà! Clockie crosses over like a ghost through a wall.
Pro tip: if you find yourself nudging the mirror back and forth for five minutes, you’re not alone. This one has sent many players into existential crises over the nature of reality. Breathe. It’s only a reflection.
Puzzle #3 – The Arched Passage Brain-Twister
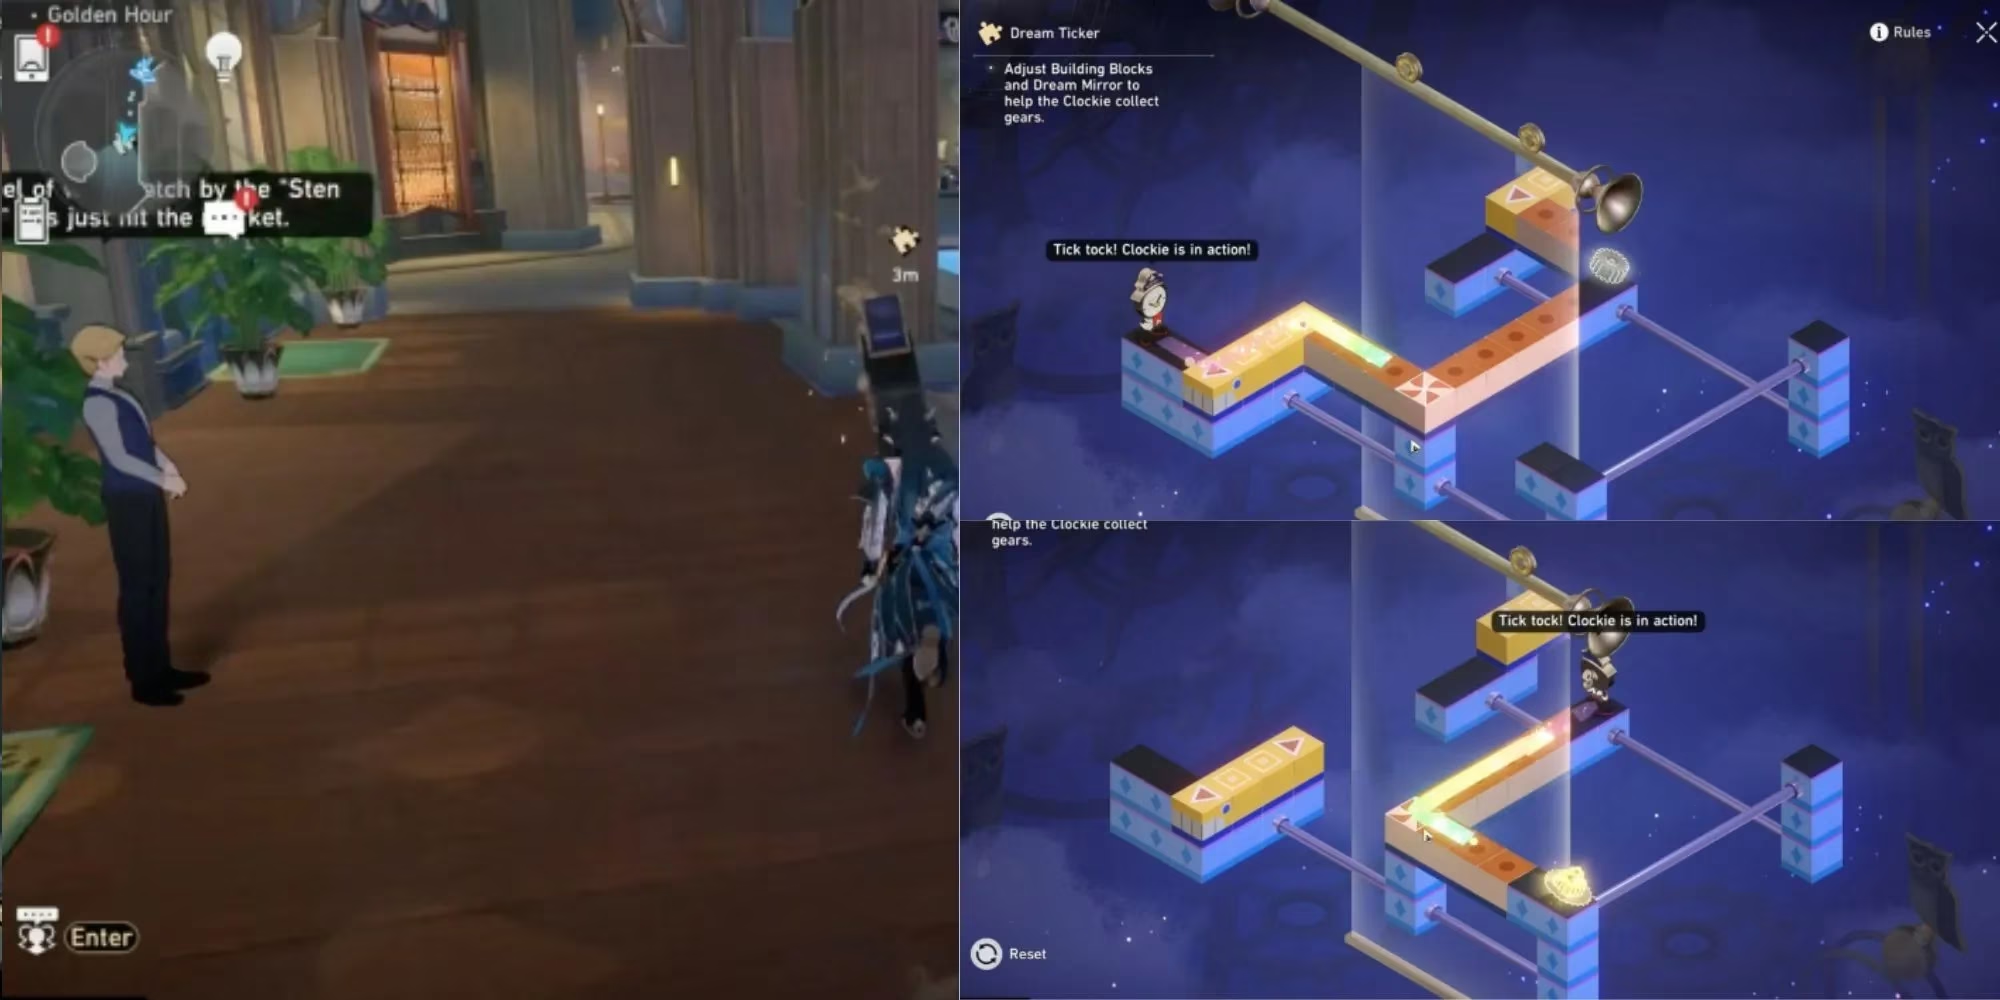
Stroll just south of the northwest teleport point, under a moody arched passage, and you’ll bump into Puzzle 3. This one introduces rotation, which is where my brain cells tend to commit mutiny. There’s a yellow block, an orange turnstile, and a mirror that’s feeling particularly uncooperative.
-
Phase 1: Slide the yellow piece until it connects to Clockie’s starting point. Then go to town on that orange rotator—give it two full twists (rotate it twice). Finally, drag the mirror all the way to the bottom right. If your screen suddenly looks like an Escher painting, you’re on the right track.
-
Phase 2: From this point, adjust the mirror a bit more—you’ll see the disjointed platforms magically align in the reflection. Then move the yellow platform to meet the mirrored illusion. Clockie saunters to victory. Rotating the orange piece without accidentally undoing your progress is the real challenge here. I like to think of it as a polite dance: spin, shimmy, don’t break anything.
Puzzle #4 – The Penthouse Floor Perfectionist
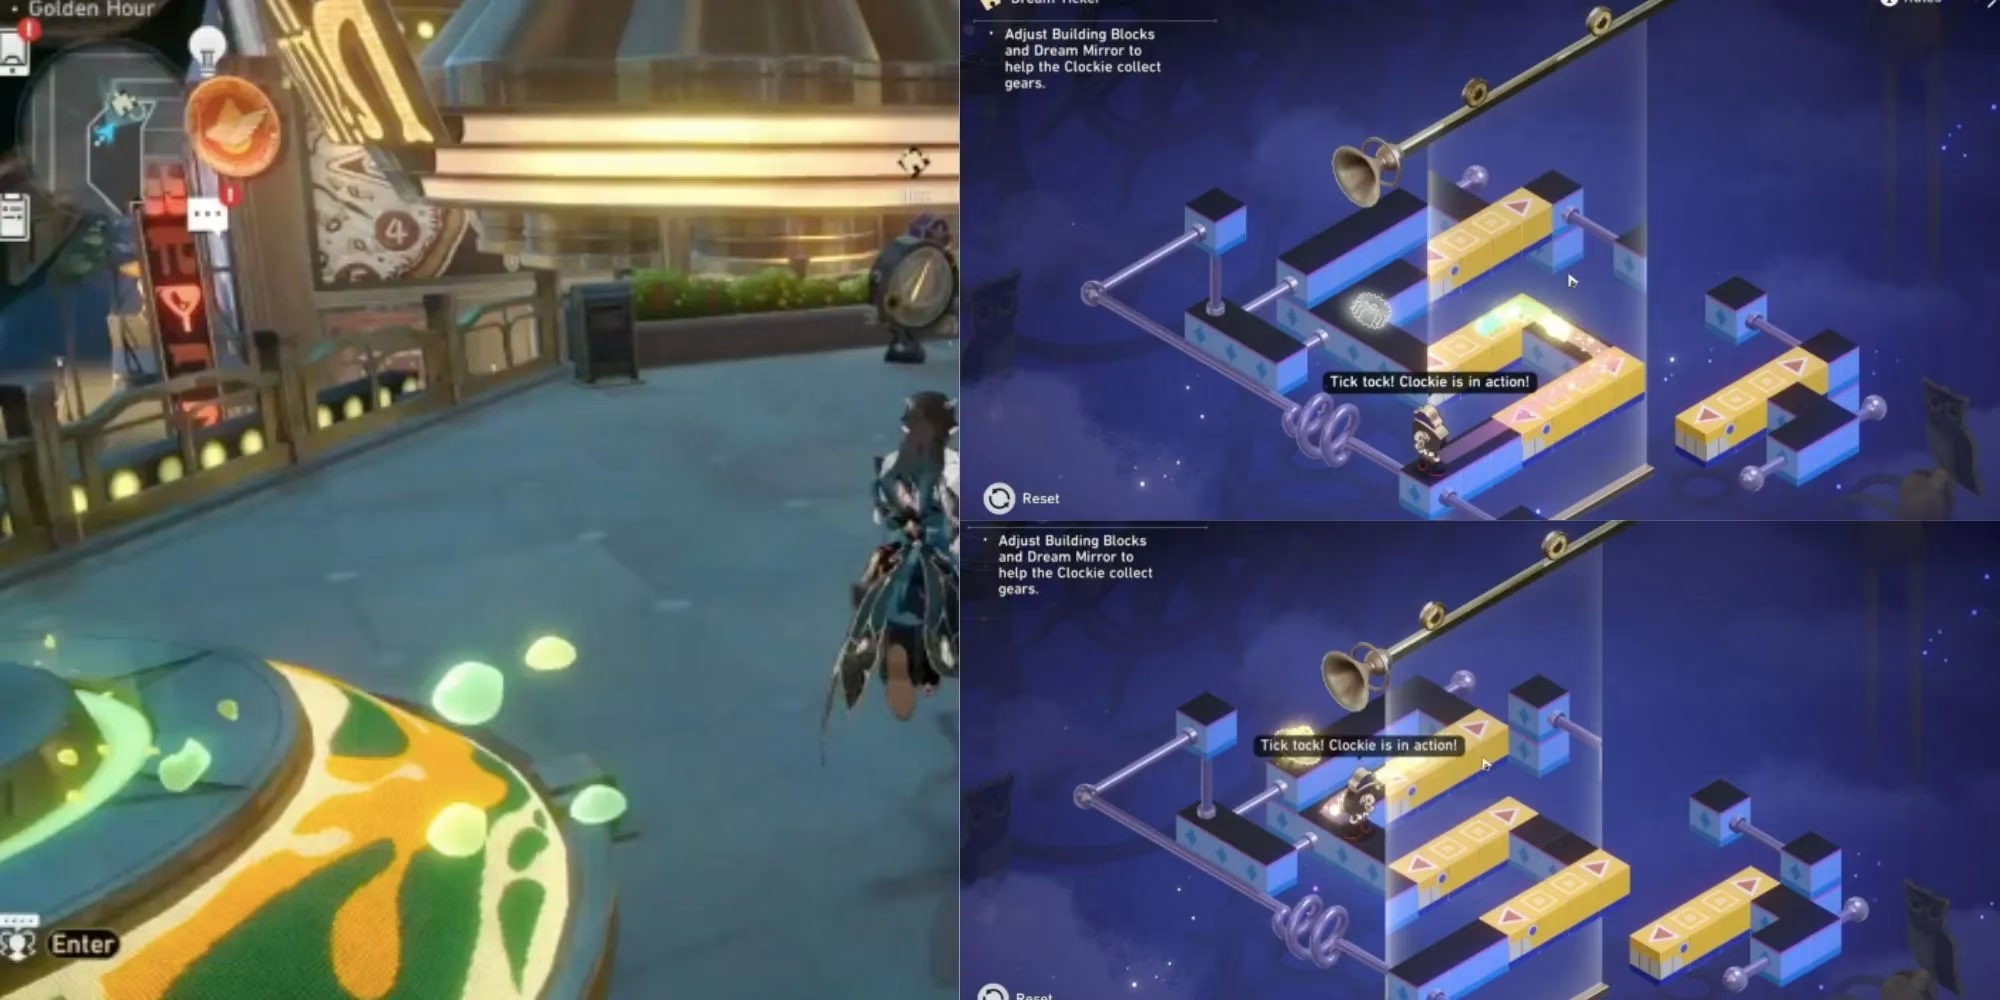
Last but not least, the third-floor puzzle. Accessible only after you’ve endured the Bubble Pinball Machine (may that invention be blessed and cursed), this puzzle boasts two movable yellow platforms and a mirror. It looks like a geometry exam, but trust me, it’s more forgiving than it seems.
-
Phase 1: Push the platform nearest the mirror all the way to where Clockie stands. Now mess with the mirror until the reflection of this platform perfectly overlays with the far gear platform. Don’t touch the other yellow block yet—it’s not invited to this party.
-
Phase 2: Here’s the fun part. Take that second yellow platform and move it only partway—let it bump against the little corner-like platform at the end, not travel the full distance. Then readjust the mirror (usually sliding it near the left edge) so the reflection fills the remaining gap. A couple of micro-adjustments, and Clockie gets a mirror highway straight to the gear.
Honestly, this final puzzle feels like a gentle goodbye after the brain-benders on the lower floors. It’s almost as if the developers wanted to reassure you that yes, you are smart enough to solve them all.
So, why are we still solving these in 2026?
Because some puzzles age like fine wine—they get funnier with time. New players still stumble into the Golden Hour with starry eyes, and veterans like me keep alt-accounts just to experience that mild frustration again. The Dream Ticker puzzles remain a masterclass in spatial thinking, coated in neon and nostalgia.
If you’re reading this, you’ve probably stared at a mirror for too long, wondering if you accidentally broke the space-time continuum. Take heart. Clockie always gets home in the end. And now, so will you.
Now go collect those Stellar Jades, you magnificent puzzle-slayer. And remember: when in doubt, blame the mirror.
This overview is based on coverage from PEGI, highlighting how puzzle-driven segments like Golden Hour’s Dream Ticker challenges can be contextualized within broader content considerations—especially when reflective “mirror world” mechanics and traversal hazards create heightened tension while still keeping the objective simple (guide Clockie across shifting platforms to a single reward gear).
Comments